How To?
- Measure the width and height of the complete wall.
-
You should not order the wallpaper in separate parts if you want the pattern to continue seamlessly between connecting walls. Add up your wall measurements.
-
IMPORTANT: Add at least 4 inches (10 cm) to the measurements for each wall, both width and height, to have some flexibility during installation.
-
We always produce your wallpaper in the exact measurements you specify when ordering.
For tips on measuring different wall types please see the cases below.

Standard Walls
Measure the width and height of the complete wall. Please double-check to make sure you get it right.

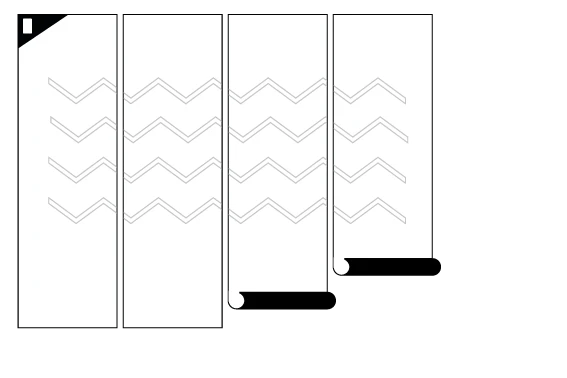
Multiple Walls For Murals
Measure the width of each of your walls and combine these measurements into one when ordering. Add 10 cm (4 inches) per wall as a safety margin. Then measure the height. Always start from the highest point and also add 10 cm (4 inches) to that measurement. You don't need to order the mural as two separate parts.

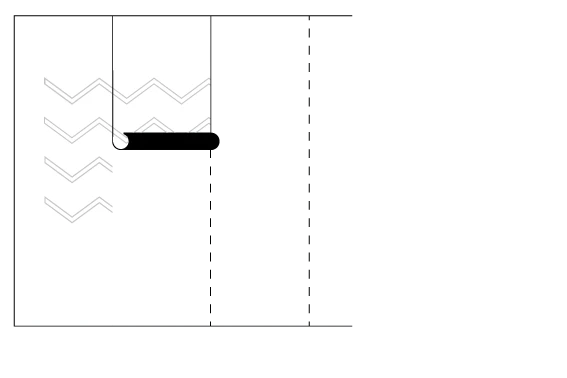
Sloped Walls
Measure the wall on the highest and widest point, ignoring any slopes. The sloped part is cut away during installation.

Multi-sloped walls
Measure the wall on the longest part in both width and height. The sloped part is cut away during installation.

Walls with Doors, Windows, or Obstacles
Measure the width and the height of the complete wall. All obstacles will be cut out during installation.

Staircases
Measure the wall at its highest and widest point, ignoring slopes. The sloping part, any excess, is cut away during installation.
***Note- Each wallpaper or mural order is custom printed with great care and effort. We cannot guarantee color accuracy for separately placed orders. To ensure that you have enough material to cover your project, we highly recommend ordering approximately 2.5-4 inches extra than your calculated amount. If you need assistance with your order, please do not hesitate to contact us.
Installation of Peel & Stick Wallpaper
The self-adhesive, high-quality textile material allows for easy installation and multiple uses. The Peel & Stick wallpaper features a fabric base with a factory-coated adhesive layer, making it suitable for walls, furniture, and doors. The vibrant colors are realistic and vivid, and the material leaves no residue when removed. It’s fully repositionable, semi-matte, and has a linen-like texture, all without the need for glue.
Tools and Equipment
- Primer
- Wallpaper brush
- Pencil
- Utility knife
- Measuring tape
- Spirit level or laser level
1. Wall Preparation
The wall must be smooth, dry, clean, and primed with an appropriate preparation. The wall color should be uniform, without strongly contrasting areas. It is necessary to remove any remnants of old paints, varnishes, and wallpapers. Freshly applied plasters or freshly painted walls should be left to dry for about three weeks. Ceramic, latex paints, and any poorly adhering surfaces should be sanded before priming the wall. To achieve the perfect effect, eliminate all imperfections. Remember to remove all sockets, baseboards, and other elements from the wall. An improperly prepared wall may prevent the correct installation of wallpaper.
2. Checking the Wallpaper
Unroll the wallpaper on a clean surface to ensure all rolls are received and the pattern matches. Check for defects like deformations, discolorations, or dimensional issues greater than 1%. If defects are found, file a complaint before installing. Each roll is numbered for easy installation.
Note: No claims on defects after installation!

3. Plan the Wallpaper on the Wall
Measure and draw a vertical line on the wall. If the wall is not perfectly straight, shift the line 2.5 cm / 1 inch to the left. This ensures accurate placement when starting from the left.
4. Wallpaper Installation
Start from the top, slowly unrolling the wallpaper and separating the backing from the adhesive. Use a wallpaper smoother to remove air bubbles. Apply each subsequent strip edge-to-edge, aligning the pattern perfectly. Once finished, trim any excess wallpaper with a utility knife, pressing carefully to avoid tearing.
HOW TO STICK WALLPAPER
Before starting the installation, make sure that the wall is properly prepared – smooth, clean, dry, and primed. The color should be uniform, and fresh plasters or paints must dry for at least 3 weeks.
Below you will find the installation instructions for two types of wallpapers: PRO-VINYL (non-woven wallpaper) and ECO (non-woven wallpaper).
Tools and Equipment
- Primer
- Heavy-duty adhesive for non-woven wallpapers
- Adhesive mixer
- Brush and roller for adhesive
- Clean, damp cloth
- Wallpaper seam roller
- Wallpaper smoother
- Pencil
- Utility knife
- Measuring tape
- Level or laser level
1. Wall Preparation (for both types)
The wall must be smooth, dry, clean, and primed with an appropriate preparation. The wall color should be uniform, without strongly contrasting areas. It is necessary to remove any remnants of old paints, varnishes, and wallpapers. Freshly applied plasters or freshly painted walls should be left to dry for about three weeks. Ceramic, latex paints, and any poorly adhering surfaces should be sanded before priming the wall. To achieve the perfect effect, eliminate all imperfections. Remember to remove all sockets, baseboards, and other elements from the wall. An improperly prepared wall may prevent the correct installation of wallpaper.
Note: No claims on defects after installation!
2. Plan the wallpaper on the wall (for both types)
To accurately install the wallpaper, measure and draw a vertical line on the wall or mark the line using a laser level. The line marked on the wall should correspond to the width of the first strip of your wallpaper. Remember that the wallpaper should have a 2.5cm / 1in allowance, and wallpapering always starts from the left side, so the line indicating the width of the first strip should be shifted to the left by 2.5cm / 1in.

3. Applying Glue
Glue is applied only to the wall. For wallpaper installation, use ready-made glue designed for heavy non-woven wallpapers. Apply a thin, even layer of glue to the wall using a paint roller or brush. The glue should be applied to the wall only in the area where the current strip is being glued, extending about 5cm / 2in beyond the strip area, do not cover the entire wall with glue at once.

4. Installing the Wallpaper
Unroll the wallpaper from bottom to top and press it against the wall with a smoothing tool or roller, removing air. Install each subsequent strip using the edge to edge method, carefully matching the pattern. After sticking, press the edges with a rubber roller. If you get glue on the wallpaper during installation, immediately wipe it off with a damp, soft cloth without scrubbing.
Excess wallpaper (waste) should be cut off with a utility knife after installation, pressing the edge of the wallpaper to avoid tearing it while cutting.